Saturday, February 4, 2023

How to install and setup Kubernetes cluster using kOps in AWS environment


Kops: Kops is also known as Kubernetes Operations, it is an open-source project which helps you to create, upgrade, destroy, and maintain a highly available, production-grade Kubernetes cluster.


Kops is an automation provisioning system:

a.      Fully Automated installation.

b.       Use DNS to identify clusters.

c.      Self-healing: Everything runs in Auto Scaling Groups.

d.      Multiple OS Supports (Amazon Linux, Debian, Flatcar, RHEL, Rocky, and Ubuntu).

e.      Highly Available support.

Pre-Requisites:

a.     “AWS CLI” must be installed and must have an AWS Account and generate AWS Keys and configure them.

Note: if you are using other than Amazon Linux, we must install AWS CLI. For Amazon Linux images AWS CLI is installed by default.

b.     “kubectl” must be installed.

c.      “kops” must be installed.


The bootstrap server can be your EC2 instance created in AWS. A bootstrap server is only needed to set up the K8s cluster by running the kops commands to initialize the cluster.


Create a bootstrap server:

a.     How to create an EC2 Instance Link: How to create an EC2 Instance

b.      How to connect to an EC2 instance using Putty Client: How to Connect to an EC2 instance using Putty client


Once you create the Bootstrap Server and connect it using the Putty client, install the following packages.


I. Install AWS CLI:

Ø  pip install awscli (or) Install AWS CLI2

Ø  AWS Configure


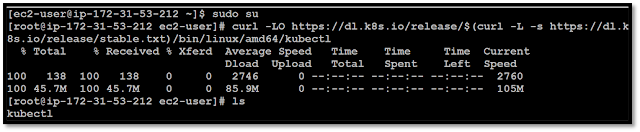
II. Install kubectl on Linux:

if CURL package not available in your OS, use the below commands to install CURL.

Ubuntu/Debian:

sudo apt-get update -y

sudo apt install curl -y

RHEL/Amazon Linux:

 sudo yum update -y  

sudo yum install curl -y

Ø  Download the latest release with the command:

curl -LO https://dl.k8s.io/release/$(curl -L -s https://dl.k8s.io/release/stable.txt)/bin/linux/amd64/kubectl


Ø  Validate the binary (optional)

 Download the kubectl checksum file:

curl -LO https://dl.k8s.io/$(curl -L -s https://dl.k8s.io/release/stable.txt)/bin/linux/amd64/kubectl.sha256


Ø  Validate the kubectl binary against the checksum file:

echo "$(cat kubectl.sha256)  kubectl" | sha256sum –check

    If valid, the output is:kubectl: OK


  Ø Give executable permission to the downloaded kubectl binary and move it to /usr/local/bin/

 chmod +x kubectl

 mv kubectl /usr/local/bin/


    Ø  Test to ensure the version you installed is up-to-date:

        kubectl version --short or kubectl version --output=yaml


III. How to install Kops.


Ø              Download the kOps from the releases package.

curl -Lo kops https://github.com/kubernetes/kops/releases/download/$(curl -s https://api.github.com/repos/kubernetes/kops/releases/latest | grep tag_name | cut -d ‘”’ -f 4)/kops-linux-amd64


       Ø  Give executable permission to the downloaded kOps file and move it to /usr/local/bin/

    chmod +x kops

    sudo mv kops /usr/local/bin/


       Ø  Run the kOps command to verify the installation.

        kops

        $kops version            


IV.            Create IAM Role

Create IAM Role and attach the role to the bootstrap server. The kops user will require the following IAM permissions to function properly:


§  AmazonEC2FullAccess

§  AmazonRoute53FullAccess

§  AmazonS3FullAccess

§  IAMFullAccess

§  AmazonVPCFullAccess

§  AmazonEventBridgeFullAccess

§  AmazonSQSFullAccess


IV.            Configure Route53 (Optional in my case)

A custom domain is required to setup the Kubernetes cluster using Kops so that Kops can create required resource records in that domain in Route 53. example – “democluster.devops-learner.com".

Gossip is alternate option if you want to deploy a cluster without a custom domain in Route 53.       To use gossip-based DNS, configure the cluster domain name to end with.k8s.local. example – "democluster.k8s.local"

V.              Create Cluster State Storage (S3 Bucket)

To store the state of your cluster, and the representation of your cluster, we need to create a dedicated S3 bucket for kops to use. This bucket will become the source of truth for our cluster configuration.


create S3 bucket. example bucket – "democluster-k8s-state-store"


IV.            Setup SSH Keys

Create SSH Keys by running “ssh-keygen -t rsa”, which creates keys in the default location $HOME/.ssh


IV.            Create cluster configuration.

Congratulations!! You have set up all prerequisites on the bootstrap server.


We’re ready to start creating our k8s cluster! setup below environment variables to start creating cluster configuration.


Custom Domain


export NAME= democluster.devops-learner.com

export KOPS_STATE_STORE=s3://democluster-k8s-state-store


I am going with the Gossip Domain.

Gossip Domain

export NAME=democluster.k8s.local

export KOPS_STATE_STORE=s3://democluster-k8s-state-store


Run below command to create cluster configuration.

$ kops create cluster --zones=us-east-1a,us-east-1b,us-east-1c ${NAME}


IV.            Modify cluster configuration (Optional)

Kops created default cluster configuration and now you can edit the configuration if needed to customize it by running below command


V.              Build a cluster

Run below command to build the cluster with the configuration that was created in the previous step. Cluster build takes a while and hence wait for longer until the cluster is ready for you.

$ kops update cluster ${NAME} --yes --admin

 (or)

                  $kops update cluster --name democluster.k8s.local --yes --admin


Note that, the configuration for your cluster was automatically generated and written to $HOME/.kube/config for you!  If config was not created then can export the config using below command

$ kops export kubecfg --admin


IV.            Validate cluster

The below commands help you to check your cluster status, If the cluster is not ready wait for a few more minutes and check again!!


$kops validate cluster


$kubectl get nodes


IV.            Delete cluster

IMPORTANT! to note that cluster resources created by Kops are not in Free Tier, hence you may need to destroy resources once you are done with the setup.


You can preview all the AWS resources that will be destroyed when the cluster is deleted by issuing the following command.


$kops delete cluster --name ${NAME}


Below command to delete resources

$ kops delete cluster --name ${NAME} --yes


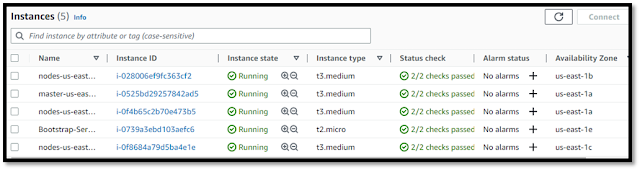
Kops Created cluster with required setup in the AWS Environment


    After Cluster deletion, all Nodes and its allocated resources got deleted / terminated.


Note: Make sure all the resources got deleted successfully and S3 bucket should be deleted manually


Pods Events:

Scheduled: Default Schedular will take care of the Pod should be scheduled  to which Workernode.

Pulling: The docker image pulling from respective docker hub/repository.

Pulled: The docker image pulled successfully.

Created: Container created for the application.

Started: The container started for the application


    Pod Running status:


Tuesday, December 20, 2022

How to Set Up a Three-Node Kubernetes Cluster on Ubuntu 20.04


Prerequisites:

Three servers running an Ubuntu 20.04 operating system on the Atlantic.Net Cloud Platform

Minimum 16 GB RAM and 5 Core CPUs on each node

A root password is configured on each server

We will use the following setup to demonstrate a three-node Kubernetes cluster:

Kubernetes Node     

IP Address     

Operating System

Master-Node

x.x.x.x

  Ubuntu 20.04

Workernode

x.x.x.x

  Ubuntu 20.04

Workernode-1

x.x.x.x

  Ubuntu 20.04


Step 1: Once you are logged in to your server, run the following command to update your base system with the latest available packages

sudo apt update -y

Step 2: Disable Swap and Enable IP Forwarding

 Memory swapping causes performance and stability issues within Kubernetes, so it is recommended to disable Swap and enable IP forwarding on all nodes.

Step 2.1: First, verify whether Swap is enabled or not using the following command:

               sudo swapon --show       


Step 2.2: Next, run the following command
to disable Swap:

               sudo swapoff -a

               Step 2.3 To disable Swap permanently, edit the /etc/fstab file and comment the line containing

swapfile:

sudo nano /etc/fstab or sudo sed -i '/ swap / s/^/#/' /etc/fstab

Comment or remove the following line:

/swapfile                                 none            swap    sw              0       0

Ctrl + o > to Write Out the changes and hit Enter then Ctrl + x > to exit from the file


Step 2.4: Next, edit the /etc/sysctl.conf file to enable the IP forwarding:

sudo nano /etc/sysctl.conf

Un-comment the following line:

#net.ipv4.ip_forward = 1

Save and close the file, then run the following command to apply the configuration changes:

Ctrl + o > to Write Out the changes and hit Enter then Ctrl + x > to exit from the file


sudo sysctl -p

Step 3 – Install Docker CE

                               Kubernetes relies on a Docker container, so you will need to install the Docker CE on all nodes. The latest version of the Docker CE is not included in the Ubuntu default repository, so you will need to add Docker’s official repository to APT.

Step 3.1: First, install the required dependencies to access Docker repositories over HTTPS:

 sudo apt-get install apt-transport-https ca-certificates curl software-properties-common -y


Step 3.2: Next, run the curl command to download and add Docker’s GPG key:

sudo curl -fsSL https://download.docker.com/linux/ubuntu/gpg | apt-key add -


Step 3.3: Next, add Docker’s official repository to the APT:

 sudo add-apt-repository "deb [arch=amd64] https://download.docker.com/linux/ubuntu  $(lsb_release -cs)  stable"


Step 3.4: Once the repository is added, run the following command to install Docker CE:

sudo apt-get install docker-ce -y


Step 3.5 Manage Docker as a non-root user

To create the docker group and add your user:

Step 3.5.1: Create the docker group.

sudo groupadd docker

Step 3.5.2: Add your user to the docker group.

 sudo usermod -aG docker $USER

Note: If you’re running Linux in a virtual machine, it may be necessary to restart the virtual machine for changes to take effect.

 Step 3.5.3: You can also run the following command to activate the changes to groups:

   newgrp docker                               

Step 3.6: After the installation, verify the Docker installation using the following command:

sudo docker --version or sudo docker info


Step 4 – Add Kubernetes Repository

By default, the Kubernetes package is not included in the Ubuntu 20.04 default repository, so you will need to add the Kubernetes repository to all nodes.

Step 4.1: First, add the Kubernetes GPG key:

sudo curl -s https://packages.cloud.google.com/apt/doc/apt-key.gpg | apt-key add


Step 4.2: Next, add the Kubernetes repository to APT:

sudo apt-add-repository "deb http://apt.kubernetes.io/ kubernetes-xenial main"


Step 4.3: Once the repository is added, update the APT cache using the command below:

sudo apt-get update -y


Step 5 – Install Kubernetes Components (Kubectl, kubelet and kubeadm)

Kubernetes depends on three major components (Kubectl, kubelet and kubeadm) that make up a Kubernetes run time environment. All three components must be installed on each node.

Step 5.1: Let’s run the following command on all nodes to install all Kubernetes components:

sudo apt-get install kubelet kubeadm kubectl -y


Step 5.2 Next, you will need to update the cgroupdriver on all nodes. You can do it by creating the following file:

                Create this file "daemon.json" in the directory "/etc/docker" and add the following

                              cd /etc/docker


                              sudo vi daemon.json


                              {

                              "exec-opts": ["native.cgroupdriver=systemd"]

                              }


                  After adding the above text to "daemon. json" press ESC from the keyboard then

                  Press ESC from the keyboard and type ":wq!" to save and quit the file.


Step 5.3: Reload the daemon and verify the docker status

                  sudo systemctl daemon-reload


                  sudo systemctl restart docker.service


                  sudo systemctl enable docker.service


                  sudo systemctl status docker.service then press "q" to quit


At this point, all Kubernetes components are installed. Now, you can proceed to the next step.


Step 6 – Initialize Kubernetes Master Node

In this section, we will see how to initialize the Kubernetes Master node.

Run the kubeadm command-line tool to initialize the Kubernetes cluster.

kubeadm init --pod-network-cidr=10.244.0.0/16 or sudo kubeadm init


Once the Kubernetes cluster has been initialized successfully, you will get the following


Verify the Kubeadm version

kubeadm version


Note: if you observe any initialization errors. please follow the steps (workaround steps here :)

1. Go to /etc/containerd directory

                              2.  Remove / Delete the config.toml file

                              3. Restart "sudo systemctl restart containerd" service


                              4. login as sudo su user and try again "kubeadm init"

From the above output, copy or note down the kubeadm join full command. You will need to run this command on all worker nodes to join the Kubernetes cluster.

If you are logged in as a regular user then run the following command to start using your cluster:

mkdir -p $HOME/.kube

sudo cp -i /etc/kubernetes/admin.conf $HOME/.kube/config

sudo chown $(id -u):$(id -g) $HOME/.kube/config


If you are the root user, you can run the following command:

export KUBECONFIG=/etc/kubernetes/admin.conf

At this point, the Kubernetes cluster is initialized. You can now proceed to add a pod network.


Step 7 – Deploy a Pod Network


 The pod network is used for communication between all nodes within the Kubernetes cluster and is necessary for the Kubernetes cluster to function properly.

 In this section, we will add a Flannel pod network on the Kubernetes cluster. Flannel is a virtual network that attaches IP addresses to containers.


Run the following command on the Master node to deploy a Flannel pod network.

kubectl apply -f https://raw.githubusercontent.com/coreos/flannel/master/Documentation/kube-flannel.yml


Next, wait for some time for the pods to be in running state. Then, run the following command to see the status of all pods:

kubectl get pods --all-namespaces

If everything is fine, you will get the following output:


Step 8 – Join Worker Nodes in the Kubernetes Cluster

After the successful pod network initialization, the Kubernetes cluster is ready to join the worker nodes. In this section, we will show you how to add both worker nodes to the Kubernetes cluster.

You can use the kubeadm join command on each worker node to join them to the Kubernetes cluster. Once the worker node is joined to the cluster, you will get the following output:

Note: The below token can be changed

"kubeadm join 10.9.204.117:6443 --token vg7zgk.w1q2vk6wu4dpz6dd --discovery-token-ca-cert-hash sha256:7859b3220eed6cb614cd54528c5a4d3b46c3e0594e4e0cebc003c3d48b918a60" 


Next, go to the master node and run the following command to verify that both worker nodes have joined the cluster:


If you forget the Kubernetes Cluster joining command, you can retrieve it any time using the following command on the master node:

kubeadm token create --print-join-command


You will get the Kubernetes Cluster joining command in the following output:


We have successfully installed Kubernetes on our Ubuntu system


How to install and setup Kubernetes cluster using kOps in AWS environment

  Kops: Kops is also known as Kubernetes Operations, it is an open-source project which helps you to create, upgrade, destroy, and maintain ...