Monday, November 22, 2021

How to install AWS CLI in Windows 10 64 Bit

 Installation instructions

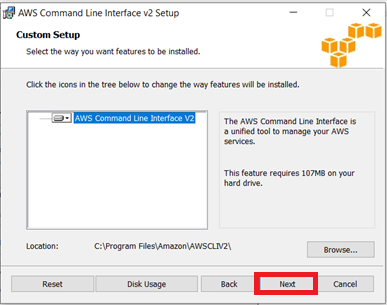
1. Download and run the AWS CLI MSI installer for Windows (64-bit): AWSCLIV2

     Alternatively, you can run the msiexec command to run the MSI installer.

    Press Win + r from keyboard then type cmd and hit "Enter" 

    Paste this msiexec.exe /i https://awscli.amazonaws.com/AWSCLIV2.msi

     press Enter to proceed with the AWS CLI installation process


AWS Configuration :


AWS Configuration and Credentials information direcotry path in windows

C:/Users/<User_Name>/.aws
Eg : 


Friday, November 5, 2021

HOW TO INSTALL ANSIBLE 2 ON AWS EC2 INSTANCE | BASIC ANSIBLE INVENTORY

 Pre-Requsites: 1. AWS Account should be created

                          2. Create 3 (Master & Two nodes) EC2 Instances EC2 Instance Creation


Step 1: Connect Amazon Linux AMI 2 / Ubuntu/ CentOS / SUSE using putty Connect Linux distro`s using Putty

Step 2: Check Ansible version whether it is already installed or not

             $ ansible --version


             $ -bash: ansible: command not found

Step 3: Ansible is available in Amazon Linux Extra topic "ansible2"

           To Install and use the Ansible in EC2 instance

           $ sudo amazon-linux-extras install ansible2


Step 4: Verify the ansible version 

            $ ansible --version


Step 5: Prepare the sample inventory file in Master node and add the Target server`s details 

            $ vi inventory.txt or vim inventory.txt 


Step 6: Connect to Target-1 server using inventory file

           $ ansible <ansible-target-server-name> -m ping -i <inventory_file_path>

           $ ansible ansible-host-1 -m ping -i inventory.txt

           You will get "Are you sure you want to continue connecting (Yes/ No)?" type yes 

            Note : you will get the following error due to invalid permissions


Step 7: Add keys to "ssh-agent bash" ssh-agent is a program that stores your passphrase and provides it automatically for you when logging in

    $ ssh-agent bash

Step 8: Copy "your-aws.pem" key to Ansible-Master server to make the communication with other target servers

          Step 8.1 :  If key alredy present in your Ansible-Master system.

                           $ cp your-aws.pem ~/.ssh 

          Step 8.2 : If "your-aws.key" not present in the system follow the below commands

                          $ creat a "your-aws.pem" file in Ansible-Master node, copy the text and paste.

                          $sudo chmod 400 ~/.your-aws.pem file 

Step 9: ssh-add is a command for adding SSH private keys into the SSH authentication agent for implementing single sign-on with SSH  .

            $ ssh-add ~/.ssh/your-aws.pem


Step 10: Connect to Target-1 server using inventory file

           $ ansible <ansible-target-server-name> -m ping -i <inventory_file_path>

           $ ansible ansible-host-1 -m ping -i inventory.txt


      Step 10.1 Connect to another server.

     $ ansible ansible-host-2 -m ping -i inventory.txt

    You will get "Are you sure you want to continue connecting (Yes/ No)?" type yes 

   Note: To avoid thsi to propmt every time need to modify the value in "ansible.cfg" file in /etc/ansible/ansible.cfg

Edit ansible.cfg using  $ sudo vi /etc/ansible/ansible.cfg

modify the value or uncomment "host_key_checking=false" then save and quit (:wq!) 

now we can connect target server without this prompt.


Step 11: if we want to ping or connect or deploy all servers together we need to add the service to inventory file


   Step 12: Connect all server at once using below command

         $ ansible servers -m ping -i inventory.txt


   Successfully installed Ansible and created sample inventory to check the connectivity between Master and target nodes.


Wednesday, November 3, 2021

How to install CentOS and increasing the disk storage capacity in Hyper-V environment ( Windows 10)


Increasing the storage capacity


Run the following command to get the details about the storage information

$ lsblk 


How to install Docker on an Amazon EC2 instance

 Pre-Requisites: 1. Create AWS Console account

                           2. Create AWS EC2 instance EC2 Instance creation link


Step 1: Launch an instance with the Amazon Linux 2 or Amazon Linux AMI and connect to EC2 instance using putty

Step 2: Update the installed packages and package cache on your instance.

                $ sudo yum update -y

Step 3: Amazon Linux 2

            $ sudo amazon-linux-extras install docker -y


           Amazon Linux.

            $ sudo yum install docker -y


Step 3: Start the Docker service.

           sudo service docker start

Step 4: Check the docker version 
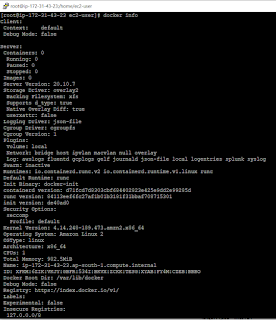
             $ docker info
Step 5: Add the ec2-user to the docker group so you can execute Docker commands without using sudo.
           sudo usermod -a -G docker ec2-user 


Step 6: Log out and log back in again to pick up the new docker group permissions. You can accomplish this by closing your current SSH terminal window and reconnecting to your instance in a new one. Your new SSH session will have the appropriate docker group permissions.

Step 7: Verify that the ec2-user can run Docker commands without sudo.
             $ docker info 
             $ docker --version
             $ docker images
             $ docker ps -a 
Step 8: Run sample docker image by pulling the hello-world image from docker hub (How to create docker Hub Account)
            $ docker run hellow-world:latest


Note
In some cases, you may need to reboot your instance to provide permissions for the ec2-user to access the Docker daemon. Try rebooting your instance if you see the following error:

Cannot connect to the Docker daemon. Is the docker daemon running on this host?


How to install and setup Kubernetes cluster using kOps in AWS environment

  Kops: Kops is also known as Kubernetes Operations, it is an open-source project which helps you to create, upgrade, destroy, and maintain ...