As an initial step to loading of docker images in Amazon ECR, Host machine installed with Docker and AWS CLI or AWSCLIV2
Docker on Ubuntu: https://devops-learner.blogspot.com/2019/10/how-to-install-and-setup-docker-in.html
Docker on AWS EC2: https://devops-learner.blogspot.com/2021/11/how-to-install-docker-on-amazon-ec2.html
Step 1: Let`s create dockerfile with a customized Apache httpd server

Step 2: Type the following command to build the Docker image using dockerfile
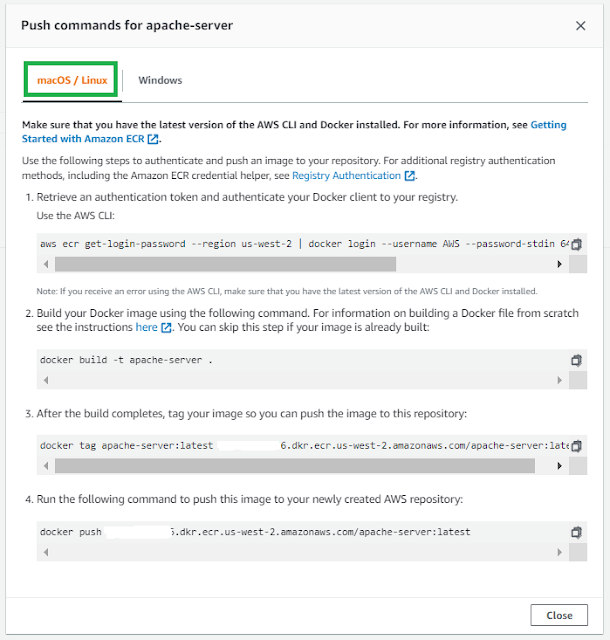
$ docker build -t apache-server -f httpd-Dockerfile .
Step 3: It will create a docker image, and you can check it by typing:
$ docker images

Step 4: Just for testing purposes, let's run a docker container using this docker image to check if everything works fine at the local host! We will run this container at port 9091 of localhost. Type the following command for that :
$ docker run -it --name apache-server -p 9091:80 httpd:latest


Now, since our docker image named “httpd” is been already created, it's time to move that image to AMAZON ECR!
Step 5: Log in to your amazon aws console and search for an ECR service to get started:


AWS CLIV2 on Windows: https://devops-learner.blogspot.com/2021/11/how-to-install-aws-cli-in-windows-10-64.html
AWS CLIV2 on Linux: https://devops-learner.blogspot.com/2022/01/how-to-install-aws-cli2-on-linux-ubuntu.html
Note: Login as the root user
Step 8: Once you type aws configure, it will ask the whole set of information to configure your account, like "access key", "secret access key", "region name" etc.Provide all the details and make sure your AWS user has permission to access AMAZON ECR service.
$ aws configure

$ mkdir .docker
$ vi config.json
Step 9: Once the ".docker" and "config.json" were created then update the necessary AWS ECR login credentials in the config.json file.

Step 10: once you get "Login succeeded", you are good to send your images to AWS ECR. Now you need to tag the image before you push it to the repo. Since our image is already created by <name>:<tag> i.e. apache-server:latest, let us tag this image, but here is the catch


After Image Pushed to AWS ECR Repository:

Hurray !!! We have pushed our custom image successfully to AWS ECR Repository ...


No comments:
Post a Comment